We are less than two months away from another epic road trip! In the first installment of the Road Trip series this spring, I have decided that the dolls are camping with us this year. I am working on some other doll camping concepts, mostly heavily influenced by
this concept. I love this idea, but hate the dolls and soda involved. Instead, I decided to sew some mummy style sleeping bags for two of our dolls from Sora's dollhouse (from
Plan Toys and
Ryan's Room).
Don't they look snug as a bug?
Supplies:
Pattern (all seems are 1/4", except along the zipper edge where the seam is 3/8")
Scrap fabric for outer fabric, lining fabric, and scrap batting or felt
Zipper (I used a 4" zipper)
1. Print pattern and cut out all pieces. Make sure the front pieces are opposite. Also, cut a 1" strip of lining fabric as long or longer than the front hood piece.
2. For full mummy style look, quilt the batting or felt onto the outside fabric. Place following the dashed lines on the pattern. I quilted about every 1". For extra detail, try to match the quilting on the two front pieces.
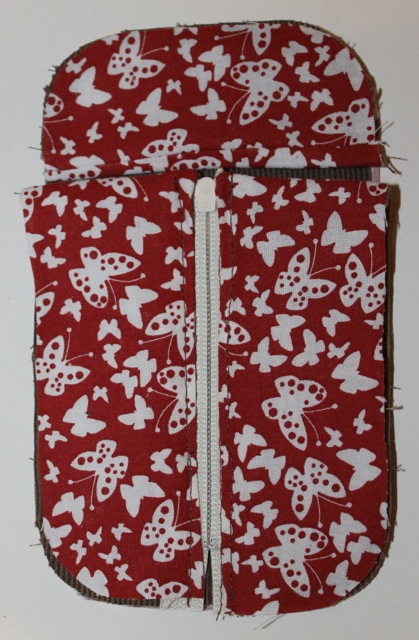
3. Place right side of zipper onto right side of one front outer fabric. You can pin into place, or if you're lazy like I am, just make sure the edges stay lined up as you sew along the zipper.
3b. When you're finished sewing, it should look like this:
4. Repeat with other front piece.
5. Prepare the front lining by ironing 1/2" of the zipper edge.
6. With right sides together, sew front lining to front outer fabric along the top edge. Repeat with other side.
7. Carefully fold front lining down, encasing the top of the zipper in the folded edge. Top stitch along zipper edge, making sure to catch the lining piece.
8. Iron the edges of the 1" piece in to meet at the middle. I used a bias tape maker for this. The result should be a 1/2" piece with two 1/4" flaps.
9. With right sides together, line up raw edge of front lining with one raw edge of bias tape. Pin and sew along fold. Repeat with front outer fabric and other raw edge of bias tape.
10. Trim edges if necessary. Match edges of lining with outer fabric and iron.
11. Lay all pieces together, with outer fabric right side together. It should look like this, with back lining right side down, back outer right side up, front hood outer side down, front zipper part outer side down:
12. Sew along edges, making sure to reinforce the places where the hood and zipper section meet the back.
That's it! I found that I didn't need to clip the corners, but you might want to. I also didn't finish any seams, but again, you may wish to.
Turn inside out and insert adorable doll.
Your dolls are ready to sleep out under the stars.


No comments:
Post a Comment